What's Included in a Roof Replacement for Homeowners
On this page
A roof replacement includes more than shingles. A complete job covers tearing off the old roof down to the wood deck, inspecting and repairing that deck, installing new underlayment and an ice barrier where code requires it, new drip edge and flashing at every edge and penetration, the new roof covering itself with matching starter and ridge cap, attic ventilation, debris haul-off and a magnetic nail sweep, the permit and required inspections, and a warranty packet you keep. That is the short answer. The longer answer is where homeowners save themselves a lot of money and a lot of regret.
Here is the trap. Two proposals can both say "replace roof" and describe completely different projects. One tears the roof to the deck, replaces all the flashing, adds an ice-and-water membrane at the eaves, balances the ventilation, and hands you a registered manufacturer warranty. The other lays new shingles over the old roof, reuses the rusty chimney flashing, skips the permit, and disappears. On the page, the second one is cheaper. On your house, it is the one that leaks in three years. The difference is not the price. The difference is the scope.
So the useful question is not "what does a roof cost" but "what is actually written into this scope, and what got left out." A roof is a layered system. Each layer has a job, and each layer is a line item a contractor can quietly drop to win a bid. Once you know what the layers are and why they exist, you can read any proposal in about ten minutes and tell whether you are buying a roof or buying a problem.
This breakdown walks the whole job in the order the crew actually works it: protect the property, tear off, inspect the deck, build the water-shedding layers from the eave up, finish the edges and penetrations, fix the ventilation, clean up, pass inspection, and hand off the paperwork. Along the way you will see which items are usually included in a base price, which ones are almost always extra, and the exact questions to ask before you sign.
Replacement vs. recover: the first fork in the road
Before any of the line items matter, you need to know which of two jobs you are buying. The National Roofing Contractors Association describes two reroofing paths: a full replacement, where the old roofing is torn off down to the deck, and a recover (also called a roof-over or overlay), where new shingles go on top of the existing layer.
A tear-off is the real thing. The crew strips everything off the roof so they can see the wood deck, fix what is rotten, and rebuild the water-shedding system from scratch. A recover is faster and cheaper because it skips all of that. It also hides every problem underneath it, traps heat in the old layer, adds weight, and almost always shortens the life of the new shingles because they are lying over an uneven surface instead of a clean deck.
There is also a hard code limit on recovers. Under the International Residential Code reroofing provisions, a roof recover is not allowed where the roof already has two or more layers of any roof covering. In plain terms: if your roof already has two layers of shingles, a third is off the table, and a full tear-off is required. This is partly a weight issue (a second or third layer is real structural load the framing may not be designed for) and partly a quality issue (you cannot inspect or repair a deck you cannot see). Atlas Roofing's summary of the 2021 and 2024 code provisions covers how these recover and tear-off rules tightened in recent code cycles.
For most homeowners replacing a worn-out roof, a full tear-off is the right and often the only legal answer. If a contractor proposes a recover, the scope should say plainly why it is allowed on your specific roof, how many layers are currently up there, and how they verified the deck is sound without removing the old covering. If they cannot answer that, treat the recover as a red flag, not a discount.
What a real tear-off includes
The demolition phase sets up everything that follows. A scope that takes tear-off seriously will spell out four things: what comes off, how the property gets protected while it does, where the debris goes, and how the deck gets inspected once it is exposed.
"Tear off" should mean the whole assembly comes off, not only the shingles. A thorough tear-off removes the old shingles, the old underlayment or felt, the old drip edge, the old pipe boots and vents, and the nails. Leaving thousands of old nails in the deck or laying new underlayment over torn felt is a corner that gets cut on cheap jobs, and it shows up later as lumps, leaks, and fasteners that miss the wood.
Property protection is part of the tear-off, even though homeowners rarely think to ask. Tens of pounds of debris and a steady rain of nails come off a roof during a strip. The scope should say how the crew protects landscaping, siding, windows, the driveway, the AC condenser, and the pool if you have one, usually with tarps, plywood leans, and ground cover. It should also say where the dumpster or dump trailer sits and who is responsible if it cracks your driveway.
Disposal is a genuine line item with a real cost. Industry cost breakdowns put disposal at roughly $40 to $60 per roofing square (a square is 100 square feet) for dumpster rental and dump fees, on top of $100 to $150 per square to remove a single layer and more for two layers, per contractor cost data compiled by Ridgeline Roofing. If a bid is suspiciously low, disposal is one of the first places it was hidden or excluded.
Here is what a tear-off section of a scope should answer:
- Are old shingles, underlayment, drip edge, pipe boots, vents, and nails all being removed?
- How will the crew protect plants, siding, windows, the driveway, and the AC unit?
- Where does the dumpster or trailer go, and who is liable for surface damage?
- Is disposal and haul-off included, or billed separately?
- How much roof will be opened at one time, and how is it made watertight if rain comes before the crew can dry it in?
That last point matters more than it sounds. A disciplined crew only opens as much roof as it can close in by the end of the day. A sloppy one strips the whole house and gambles on the weather. Ask how they handle a surprise storm with the deck exposed.
The deck: the most underestimated line item
Underneath your shingles is the roof deck, usually plywood or oriented strand board (OSB) nailed to the rafters or trusses. It is the structural surface everything else fastens to. You cannot see it until the old roof comes off, which is exactly why it causes more surprise bills and more arguments than any other part of the job.
Most roof replacements include deck inspection, not automatic deck replacement. The crew walks the exposed deck looking for rot, soft spots, delamination (where OSB layers swell and separate after getting wet), water staining, and broken or sagging sheets. Anything compromised gets cut out and replaced because new shingles fastened to bad wood will not hold. The question is never whether deck repair might be needed. The question is how your contract prices it.
This is the single most important clause to nail down before you sign. A strong deck clause defines a per-sheet or per-square-foot unit price agreed in advance, and a documentation process so you are not left simply trusting a number. A weak clause says nothing, which means whatever wood the crew claims to have replaced is whatever shows up on the final bill, with no way to check it.
Use this table to judge a deck clause:
| Deck clause style | What it means | Homeowner risk |
|---|---|---|
| Silent (no mention) | Decking handled however the crew decides | High: surprise bill, no proof |
| "Included up to X sheets" | A set number is bundled; extra is billed | Medium: know the unit price beyond X |
| Per-sheet / per-sq-ft unit price | Each replaced sheet billed at a set rate | Low, if photos back it up |
| Allowance dollar amount | A budget set aside; overage billed | Medium: confirm what triggers overage |
Whatever style your contractor uses, require photos. Ask for pictures of every area of bad decking before the new underlayment covers it, showing the roof section, the damage, and the repaired patch. Reputable crews already do this. The photos protect you from being billed for wood that was fine, and they protect the contractor from a homeowner who later claims the work was never done. Keep those photos with your records. Contractors who use property-record tools like RoofPredict often attach before-and-after deck photos to the home's file so the whole job stays documented in one place rather than scattered across a crew lead's phone; either way, the point is the same: get the evidence before it is buried under a new roof.
A fair deck unit price plus required photos turns the scariest part of a roof replacement into a predictable one. A roof with hidden rot is not a reason to panic. A roof with hidden rot and no agreed price for fixing it is.
Building the water-shedding system from the eave up
With the deck sound, the crew builds the layers that actually keep water out. They go on from the bottom edge upward so every layer overlaps the one below it like fish scales, and every code requirement here exists because of a specific failure that used to soak people's ceilings.
Ice-and-water barrier at the eaves and valleys
In cold climates, the first thing down at the eaves is a self-adhering ice-and-water membrane. The IRC ice barrier requirement calls for it wherever there is a history of ice forming along the eaves and backing up water. The membrane must run from the lowest edge of the roof to a point at least 24 inches inside the exterior wall line, and on steep roofs (8:12 pitch or greater) at least 36 inches measured up the slope. This sticky membrane seals around the nails driven through it, so when an ice dam forms and water pools behind it, the roof does not leak.
Good crews also run ice-and-water in the valleys and around penetrations even where code does not strictly demand it, because valleys carry the most water on the roof. In warm, dry climates the eave membrane may not be required at all. The scope should say where ice-and-water is going and reference the local requirement, rather than leave "ice and water shield" floating as a line nobody defined.
Underlayment across the field
Over the rest of the deck goes the underlayment, the second line of defense beneath the shingles. The IRC requires underlayment for asphalt shingles, with the type and number of layers varying by roof slope and wind exposure. Most modern installs use a synthetic underlayment, which is lighter, tougher, and far more tear-resistant than the old asphalt-saturated felt. On low-slope roofs in the 2:12 to 4:12 range, code requires two layers of underlayment lapped in a specific pattern because shingles shed water more slowly at a shallow pitch.
Underlayment is a backup, not the hero. It buys time if water gets past a shingle and protects the deck during installation before the shingles are on. It does not replace correct flashing, correct slope, or correct shingle nailing. If a salesperson is selling you a roof primarily on the underlayment upgrade, ask what the flashing and ventilation plan looks like, because that is where roofs actually leak.
Starter strip and the field shingles
At the eaves and rakes, a dedicated starter strip goes down first. Starter is not the same as a field shingle flipped backward; it is a purpose-made strip with the adhesive positioned to seal the first course and resist wind uplift at the edge, which is exactly where wind tries to peel a roof. The scope should list starter as its own line. Then come the field shingles, the ones you see, installed in courses up the roof.
Nailing is where field installation quietly succeeds or fails, and you will never see it once the next course covers it. The Asphalt Roofing Manufacturers Association is direct that correct nailing, the right number of nails in the right line driven flush, is essential to shingle performance and that manufacturer instructions and code must be followed. Most architectural shingles want a specific nail count in a defined zone; high-wind installs require more. Nails driven too high miss the next shingle's seal, and overdriven nails cut into the shingle. You cannot inspect this from the ground, which is why hiring a careful crew matters more than the shingle brand.
The roof covering itself: more than a color choice
The shingle is the part everyone pictures, but the roof covering is a small package of parts, not one product, and the scope should name each piece. For an asphalt shingle roof that means the field shingles, the starter strip at the edges, the hip-and-ridge cap that finishes the peaks, and the fasteners and accessories that tie the system together. When a proposal lists only a brand and a color, it has named one of those four parts and left the rest as an assumption.
The field shingle itself comes in tiers, and the tier changes both the price and the expected life. Three-tab shingles are the flat, single-layer, economy option and the shortest-lived. Architectural (also called dimensional or laminate) shingles are the modern default: thicker, layered, more wind- and impact-resistant, and better looking. Premium and designer lines mimic slate or shake and carry the longest material warranties. The National Association of Home Builders' service-life data and the broader contractor consensus put architectural asphalt in roughly the 20-to-30-year range and 3-tab closer to 15-to-20, though the NRCA stresses that real-world lifespan swings substantially with climate, ventilation, and install quality. A 30-year shingle is a marketing name for the product line, not a guarantee your roof lasts 30 years.
A quick orientation to the asphalt tiers:
| Shingle tier | Typical look | General service-life range | Notes |
|---|---|---|---|
| 3-tab | Flat, uniform | ~15-20 years | Economy; lowest wind/impact resistance |
| Architectural / dimensional | Layered, dimensional | ~20-30 years | Modern default; better wind resistance |
| Class 4 impact-resistant | Architectural look | ~20-30 years | Hail resistance; possible insurance discount |
| Premium / designer | Slate or shake imitation | 30+ years | Highest cost and longest material warranty |
The starter strip and the hip-and-ridge cap are not optional extras to be value-engineered out. Starter seals and anchors the first course against wind uplift at the most vulnerable edge of the roof. Ridge cap is the purpose-made shingle that caps the peaks and the hips; using cut-up field shingles as ridge cap is a corner that shows up as cracking and blow-offs at the ridge a few years on, and it can also disqualify an enhanced manufacturer warranty that requires matched system components. If the scope does not list starter and ridge cap as their own lines, ask what is being used for each.
Beyond asphalt, the same scope logic applies to other coverings, though the layers and details differ. Metal roofing (standing seam or metal shingle) costs more up front and lasts longer. Tile and slate are heavier and may require a framing check. If you are comparing a non-asphalt covering, the underlayment, fastening, and flashing details all change, so make sure the proposal is written for the actual material rather than copied from an asphalt template.
Edges, flashing, and penetrations: where roofs actually leak
Field shingles rarely fail in the middle of a wide-open slope. Roofs leak at the edges, the transitions, and the holes. This part of the scope is the part cheap bids gut first, because reusing old metal saves real money and the homeowner cannot tell from the curb.
Drip edge
Drip edge is the metal that wraps the eaves and rakes, directing water off the deck edge and into the gutter instead of behind it. It is not optional. The IRC drip edge requirement (R905.2.8.5) states a drip edge "shall be provided at eaves and rake edges of shingle roofs," overlapped at least 2 inches, extending at least 1/4 inch below the sheathing and back up onto the deck at least 2 inches, fastened every 12 inches. There is even a code-correct sequence: underlayment goes over the drip edge at the eaves and under it at the rakes. The code analysis at Jaspector lays out the 2024 IRC language. If "drip edge" is missing from a proposal, it is either an oversight or a corner, and either way it is a question to ask before you sign.
Flashing at every transition
Flashing is the metal that seals the joints where the roof plane changes or meets something else: chimneys, walls, dormers, skylights, and valleys. Each type has a name and a job. Step flashing weaves into the shingle courses where a roof meets a sidewall. Apron (or headwall) flashing seals where a slope meets a vertical wall at the top. Counter flashing tucks into a chimney or masonry wall over the base flashing. Valley flashing carries the high-volume runoff where two slopes meet.
The big decision is replace versus reuse. New flashing is best practice on a tear-off, and many quality scopes specify all-new step, apron, and counter flashing in color-matched metal. Reusing old flashing can be acceptable when it is in genuinely good shape, but it is also where leaks restart, because old metal is often rusted, bent, or sealed only with a smear of caulk that has long since failed. The scope should name each flashing location and say replace, reuse, or repair for each one. "Flashing as needed" is not a scope. It is a blank check pointed the wrong way.
Chimney flashing deserves special attention because it sits at the intersection of roofing and masonry. Properly done, it is a two-part system: base flashing under the shingles and counter flashing cut into the brick above. A crew that just runs a bead of roof cement around the chimney has not flashed it; they have postponed the leak. If your chimney needs masonry work too, that is usually a separate trade and a separate cost, and the scope should say who owns it.
Penetrations
Every pipe, vent, and mount that pokes through the roof is a potential leak. The scope should list new pipe boots (the rubber-and-metal collars around plumbing vents, which crack and fail long before the shingles do), new or reset roof vents, and a plan for satellite dishes, abandoned brackets, solar standoffs, and skylights. Old pipe boots are one of the most common single sources of an interior leak on an otherwise sound roof, and replacing them during a reroof costs almost nothing compared to chasing the leak later.
Skylights are their own decision. The glass and the flashing kit age at different rates, and the smart time to replace an aging skylight is during the reroof, while the surrounding shingles are off and the flashing is already being rebuilt. Resealing an old skylight under a new roof, only to have it leak a year later, means opening up a brand-new roof to fix it. The discussion of skylight timing from Southern Home Improvement walks through why coordinating the two saves money. Ask whether your skylights are being replaced, reflashed, or left alone, and get the answer in writing.
| Flashing / penetration | Best practice on tear-off | Common cut corner |
|---|---|---|
| Drip edge (eaves & rakes) | New, code-compliant overlap | Omitted or reused |
| Step flashing (sidewalls) | New, woven into courses | Old metal reused, caulked |
| Chimney flashing | New base + counter flashing | Roof cement smear |
| Valley | New metal or ice-and-water | Skimped / reused |
| Pipe boots | All new | Reused cracked boots |
| Skylights | Replace or reflash on reroof | Sealed over, leaks later |
Ventilation: the line item that decides how long the roof lasts
Ventilation is invisible from the street and easy to skip, and skipping it is one of the fastest ways to cook a new roof from underneath. A roof system breathes: cool air enters low at the soffits or eaves (intake) and warm, moist attic air exhausts high at the ridge (exhaust). Get the balance wrong and you trap heat and moisture against the deck, which shortens shingle life, warps the deck, grows mold, and in winter feeds the ice dams the eave membrane is fighting.
The baseline target most codes and manufacturers use is 1 square foot of net free ventilation area for every 300 square feet of attic floor when there is a vapor barrier and the intake and exhaust are balanced, dropping to 1:150 without a balanced or vapor-controlled setup. The NRCA attic ventilation guidelines and manufacturer references like the GAF ventilation calculator cover how to size it for a specific attic. The key principle is balance: roughly half the venting at intake low on the roof and half at exhaust near the ridge. Too much exhaust with too little intake makes a ridge vent pull air from other roof vents instead of the soffits, which can actually make things worse.
A reroof is the natural moment to fix ventilation, because the roof is open and the exhaust vents are being replaced anyway. The scope should say which exhaust vents are going in (a continuous ridge vent over the shingle ridge is common, but box vents or others may fit your roof), whether soffit intake is adequate or blocked, and whether any powered or older vents are being removed. A contractor who measures your attic and proposes a balanced system is doing the job. One who replaces three old box vents with three new box vents without checking intake is just swapping parts.
Do not let a salesperson oversell powered attic fans as a cure-all. Per NRCA, a power vent moving 1.0 cubic foot per minute per square foot of attic floor is roughly equivalent to a 1:150 ratio, but a powered fan with poor intake can pull conditioned air out of your living space through ceiling gaps and drive up your cooling bill. Passive, balanced ventilation is what most roofs want. If a fan is proposed, ask what problem it solves that intake and a ridge vent do not.
Permits, inspections, and who pulls them
A full roof replacement is permitted work in most of the country. Industry surveys suggest the large majority of municipalities require a building permit for a full reroof, with the homeowner ultimately responsible for confirming it, even when the contractor pulls it. The general guidance compiled at SquareDash's state-by-state permit overview shows how widely the rules vary, and reminds homeowners that verifying the permit requirement is on them.
The permit is not bureaucratic busywork. It triggers a municipal inspection that gives you an independent set of eyes confirming the work met code, the deck was sound, and the flashing and ice barrier were done right. That inspection record is also exactly what a future buyer's home inspector and your insurer will want to see. A contractor who suggests skipping the permit to save time or money is offering to remove your only independent quality check, and is leaving you holding the liability if unpermitted work surfaces during a future sale or a claim.
The scope should say plainly: who pulls the permit, whether the permit fee is included or passed through, and who schedules the required inspections. Permit fees commonly run a few hundred dollars depending on jurisdiction and home value. If the contract is silent on permits, ask the question before signing, not after the crew shows up.
This is also where a clear-eyed look at the contractor matters. The Federal Trade Commission's guidance on avoiding home improvement scams is worth reading before you hire: get everything in writing, be wary of large upfront cash demands, and do not let anyone pressure you into signing on the spot. Roofing attracts storm-chasing outfits precisely because the most important decisions are hidden until the old roof is open, and a vague contract gives a bad actor room to improvise on your dime.
What the job actually looks like, day by day
Knowing the sequence helps you spot whether a crew is working the job in the right order, and it tells you when to be home and what to watch for. Most single-family asphalt reroofs run one to three days; steep or cut-up roofs and bad weather stretch that out. The order rarely changes, even when the timeline does.
A typical sequence looks like this:
- Delivery and staging. Materials get dropped, often a day before. The dumpster or trailer is positioned. The crew protects landscaping, siding, windows, and the driveway, and covers attic contents below the work if needed.
- Tear-off. The crew strips the old roofing, underlayment, drip edge, boots, and nails down to the deck, working a section at a time so they can dry it in before weather hits.
- Deck inspection and repair. The exposed deck gets walked and probed. Bad sheets are cut out and replaced, and this is when the deck-repair photos should be taken, before anything covers them.
- Dry-in. Ice-and-water membrane goes down at the eaves and valleys where required, then underlayment across the field, then drip edge in the code-correct sequence. At the end of this step the roof is watertight even before the shingles are on.
- Shingling. Starter at the edges, field shingles up the slopes, flashing woven in at walls and penetrations, then hip-and-ridge cap and the ridge vent to finish.
- Cleanup and walkthrough. Debris haul-off, magnetic nail sweep, gutter clearing, and a ground-level walkthrough with the contractor.
- Inspection and handoff. The municipal final inspection (where required) and delivery of your warranty and document packet.
Weather is the wildcard. A responsible crew watches the forecast and only opens what it can close. If rain catches the job mid-tear-off, the deck should be tarped and protected, never left bare overnight. Ask in advance how the contractor handles a washout day, because a roof half-open under a thunderstorm is the fastest way to put water in your house during the one project meant to keep it out.
Insurance claims vs. paying out of pocket
How your roof replacement gets paid changes the paperwork, not the scope. The roof should be built the same correct way whether you write the check or your insurer does, but a claim-driven job adds a layer of documentation and a few traps worth knowing.
If a storm damaged your roof, an insurance claim may cover replacement, typically when wind or hail caused sudden damage rather than gradual wear. Wind and hail drive a large share of residential property claims, and a roof's storm history is part of what an adjuster weighs. The honest framing matters here: a roofing contractor and a tool that estimates storm exposure can help you understand whether your roof was likely hit, but neither one decides coverage. The adjuster and your policy decide coverage. Anyone who promises your claim will be approved, or offers to "handle" your deductible, is waving a red flag; the FTC's warnings about home improvement scams apply with extra force to storm-chasing claim operations.
A few things to keep straight on an insurance job:
- The scope is still yours to read. An insurance estimate (often written in Xactimate) is a line-item scope just like a contractor's proposal. The same checks apply: is the deck addressed, is flashing replaced, is the permit included, is ice-and-water in cold climates listed.
- Match your contractor's scope to the claim scope. Gaps between what the insurer approved and what the contractor will install become your out-of-pocket cost. Walk both documents line by line.
- Document everything before the tear-off. Date-stamped photos of the damage, the deck, and the repairs protect you if the claim is questioned. This is where keeping an organized property record pays off; contractors who use tools like RoofPredict often store the home's storm history and before-and-after photos in one file, but you can keep your own folder just as well.
- Know your deductible and any depreciation holdback. Many policies pay actual cash value up front and release the recoverable depreciation only after the work is done and documented. Read those terms before you sign with a contractor.
Whether the job is insurance or out of pocket, the standard does not move. You still want a full tear-off, a real deck clause, new flashing, balanced ventilation, a permit, and a registered warranty. The claim changes who pays and how much you document, not what a good roof includes.
Cleanup and the final walkthrough
The job is not done when the last shingle is nailed. A professional scope treats cleanup as work, not an afterthought, and names it specifically. "Leave clean" is not a spec. Here is what should be:
- All roofing debris hauled off-site
- Magnetic nail sweep of the lawn, driveway, and surrounding ground (run more than once for a big job)
- Gutters cleared of roofing debris
- Landscaping, driveway, and siding checked for damage
- Leftover materials removed or, if you want them, clearly handed over
The magnetic sweep matters more than homeowners expect. A roof tear-off scatters hundreds of nails, and a single one in a tire, a bare foot, or a pet's paw turns a finished job into a complaint. Reputable crews run a rolling magnet across the whole work area, sometimes twice. If you have kids, pets, or a shared driveway, say so before the crew arrives so they plan staging and cleanup around it.
Finish with a ground-level walkthrough alongside the contractor. You do not climb the roof; you walk the perimeter and look up. Check the shingle lines for straightness, the ridge cap, the valleys, the flashing at walls and chimney, the new pipe boots, the gutters, the siding, the windows, and the cleanup. Look for stray debris, dented gutters, and trampled landscaping. This is the moment to raise anything that looks off, while the crew is still on-site and motivated to make it right.
The handoff: paperwork you should walk away with
A roof replacement should leave you with a record, not only a roof. The handoff is the part that protects you for the next twenty years, and it is the part that gets forgotten in the relief of finishing. Insist on a packet that includes:
- Final invoice itemized against the original scope
- Manufacturer warranty documents and confirmation of registration
- Workmanship warranty terms from the contractor, in writing
- Product information: shingle line, color, and accessories actually installed
- Permit and final inspection record
- Deck repair photos and notes
- A written list of anything observed but not repaired (a soft fascia, a chimney crown issue, an electrical mast) so it is documented even if it was outside the roof scope
The warranty piece is where homeowners get confused, so it is worth separating. There are two distinct warranties, and they cover different things. The manufacturer warranty covers the materials if the shingles themselves fail prematurely. The contractor's workmanship warranty covers the installation if the roof leaks because of how it was built. A leak from a botched flashing detail is a workmanship issue, not a material defect, which is why the contractor's own warranty matters as much as the brand name on the shingle.
Enhanced manufacturer warranties add coverage but come with strings. A top-tier system warranty like the GAF Golden Pledge, for example, requires the installer to be a certified contractor, requires a full system of qualifying components rather than just the shingle, and requires registration. The same pattern holds across the major brands: the enhanced coverage exists only when a qualified contractor installs a complete matched system and registers it. Ask which warranty you are actually getting, what voids it, whether it transfers if you sell the house, and whether registration was completed. Get the registration confirmation in your packet, not as a promise.
Keep this packet somewhere you will find it years from now, because you will need it twice: when you sell the house and a buyer's inspector asks about the roof, and if a storm or a defect ever forces a claim. A roof with full documentation is worth more and easier to insure than an identical roof with no paper trail.
What is usually NOT in the base price
Most roof replacement disputes are not about bad work. They are about a homeowner who assumed something was included and a contractor who always treated it as extra. The contract controls, but these items are the usual suspects, and you should confirm each one in writing rather than assume:
- Decking, fascia, or rafter-tail repair discovered after tear-off (this is why the deck unit price matters)
- Chimney masonry repair, crown work, or a new chase cover
- Skylight replacement, or solar panel removal and reinstallation
- Gutter replacement or gutter-guard removal and reinstallation
- Ventilation upgrades beyond a like-for-like vent swap
- Interior repairs: drywall stains, insulation, or mold remediation
- Permit fees, HOA architectural approval, or engineering letters
- Upgrades: impact-resistant shingles, premium underlayment, cool-roof or designer colors, special-order products
- Extra access protection for pools, steep roofs, or delicate landscaping
A few of these are worth a real conversation rather than a reflexive no. Impact-resistant shingles are the clearest example. To earn a Class 4 rating under the UL 2218 standard, a shingle has to survive a hit from a 2-inch steel ball without cracking, and many use polymer-modified asphalt to stay flexible under impact. The FEMA case study on hail-resistant roofing documents how these roofs held up where standard shingles failed, and many insurers offer a premium discount for Class 4 in hail-prone regions. That is a real, sourced benefit, not a sales line, and it can be worth the upgrade where hail is a regular visitor. Just ask for the specific product documentation and confirm any insurance discount with your own carrier rather than taking it on faith.
Cool-roof colors are similar. ENERGY STAR explains that cool roofs use higher solar reflectance to stay cooler in the sun, which is a genuine effect. Whether it pays off depends on your climate, attic, and insulation, so treat it as a regional decision, not a guaranteed utility savings.
How much of this is driven by your specific roof
The scope is the same idea on every house, but the size of each line item swings hard based on the roof you actually have. The biggest cost lever is labor, not materials. A 2026 cost analysis cited by This Old House put labor at the largest single share of total project cost on a typical reroof, which means anything that slows the crew down moves the price more than the shingle brand does.
The things that slow a crew down are pitch and complexity. A steep roof (8:12 and up) requires safety staging and slower, more careful footing, adding meaningfully to labor. A cut-up roof with multiple valleys, dormers, skylights, and chimneys costs more because every one of those intersections has to be hand-flashed and waterproofed, and hand work is slow work. A simple gable roof with two planes and one plumbing vent is the cheap end of the range for a reason. Ridgeline's cost breakdown and the Jamar Roofing rundown of 2026 cost drivers both put pitch, complexity, layer count, and hidden deck repair at the top of the list.
| Cost driver | Why it moves the price | Where it shows up in the scope |
|---|---|---|
| Roof pitch | Steep slopes need staging, slow the crew | Labor; access protection |
| Layers to remove | Two layers cost more to strip and dump | Tear-off; disposal |
| Valleys, dormers, skylights | Each transition is hand-flashed | Flashing line items |
| Hidden deck rot | Found only after tear-off | Deck unit price |
| Material grade | 3-tab vs. architectural vs. Class 4 | Roof covering line |
| Steep/limited access | Slower staging, more protection | Labor; cleanup |
Which brings up the question of whether your roof is even due for replacement, or just due for a repair. Asphalt shingle life depends heavily on local climate; the National Association of Home Builders' service-life data and the broader contractor consensus put architectural asphalt shingles in roughly the 20-to-30-year range and 3-tab shingles closer to 15-to-20, with the NRCA noting that real-world lifespan can swing substantially with climate, ventilation, and install quality. A roof's exact age is rarely written down anywhere a homeowner can find it; Zillow and county records show the year the house was built, not the last time the roof was redone. This is the same blind spot contractors face from the other side: they often cannot tell which homes on a street have a tired roof versus a recent re-roof. Tools like RoofPredict estimate a roof's age as a range and weigh in recent storm exposure to flag which homes are likely due, which is useful for a contractor deciding where to focus and, for a homeowner, a reminder that roof age is a planning estimate, not an exact date stamped on the shingles.
A copy-ready scope checklist
Use this to read any proposal. If a line is missing, that is your question to the contractor. Paste it into an email and ask them to confirm each item in writing:
ROOF REPLACEMENT SCOPE CHECK

TEAR-OFF
[ ] Full tear-off to deck (not a recover) - confirmed
[ ] Old shingles, underlayment, drip edge, boots, vents, nails removed
[ ] Property protection: plants, siding, windows, driveway, AC
[ ] Dumpster/trailer location + driveway liability stated
[ ] Disposal & haul-off included

DECK
[ ] Deck inspected after tear-off
[ ] Deck repair unit price stated ($/sheet or $/sq ft)
[ ] Photos of any bad decking required before cover-up

WATER-SHEDDING LAYERS
[ ] Ice-and-water at eaves/valleys per local code
[ ] Underlayment type named (synthetic / felt)
[ ] Starter strip listed as its own line
[ ] Field shingle line + color named
[ ] Hip/ridge cap material named

EDGES, FLASHING, PENETRATIONS
[ ] Drip edge at eaves AND rakes
[ ] Step / apron / counter flashing: replace or reuse stated per location
[ ] Chimney flashing detail (base + counter, not a caulk smear)
[ ] Valley method named
[ ] New pipe boots
[ ] Skylights: replace / reflash / leave - stated

VENTILATION
[ ] Exhaust vents named (ridge / box / etc.)
[ ] Intake (soffit) checked and adequate
[ ] Old/powered vents addressed

ADMIN
[ ] Permit: who pulls it, fee included?
[ ] Required inspections scheduled by whom?
[ ] Change-order process in writing

CLEANUP & HANDOFF
[ ] Magnetic nail sweep (more than once on big jobs)
[ ] Gutters cleared of roofing debris
[ ] Ground-level walkthrough with contractor
[ ] Warranty packet: manufacturer + workmanship, registered
[ ] Product info, permit/inspection record, deck photos
[ ] Written list of anything observed-but-not-repaired
Common mistakes homeowners make
A few patterns cost homeowners money over and over.
Comparing totals instead of scopes. The cheapest bid is often cheapest because it excluded flashing, the permit, disposal, or a real deck clause. Line up the scopes side by side before you ever compare the bottom line. A higher bid with everything written in can be the cheaper roof once the surprises land.
Buying on shingle brand and color. The brand on the wrapper matters far less than the crew driving the nails and flashing the chimney. A premium shingle installed by a crew that reused rusty flashing and skipped the starter strip is a premium-priced leak. Spend your scrutiny on the install details and the contractor, not the swatch.
Skipping the permit to save a few hundred dollars. You are not saving money; you are removing your independent inspection and creating a problem for your future home sale and any future claim. The permit is cheap insurance.
Not getting deck pricing in advance. This is the number-one source of surprise bills. Settle the per-sheet price and the photo requirement before the first shingle comes off.
Treating the warranty as automatic. Enhanced warranties require a certified installer, a full matched system, and registration. If nobody registered it, you may not have the coverage you think you paid for. Get the confirmation in your packet.
Losing the paperwork. The single best thing you can do after the job is put the whole packet somewhere you will find it in fifteen years. Future-you, selling the house or filing a claim, will be grateful.
A roof replacement done right leaves you with a watertight, code-compliant, well-ventilated roof and a complete record of what was removed, what was found, what was installed, what was excluded, and who to call if something goes wrong. Everything in this breakdown points at one outcome: a written scope specific enough that you, the contractor, and a building inspector would all describe the same job. Get that, and the price takes care of itself.
Sources checked: June 18, 2026.
FAQ
Does a roof replacement always include new decking?
No. Most roof replacements include deck inspection, not automatic full deck replacement. The crew strips the old roof, walks the exposed deck, and cuts out any rotten, soft, or delaminated wood, but a sound deck is usually reused. Because you cannot see the deck until tear-off, the important thing is a contract that states a per-sheet or per-square-foot price for any replacement and requires photos before the new underlayment covers the repairs.
Should flashing be replaced during a roof replacement?
On a full tear-off, new flashing is best practice, especially step, apron, and counter flashing at walls and chimneys. Old metal can sometimes be reused if it is genuinely in good shape, but flashing is exactly where leaks restart, so reusing rusted or caulked-over metal is a common cut corner. Insist the scope name each flashing location, chimney, sidewalls, valleys, skylights, and pipe boots, and state replace, reuse, or repair for each one rather than saying flashing as needed.
Are gutters included in a roof replacement?
Not automatically. Some scopes include removing and resetting gutters, some include full gutter replacement, and many exclude gutters entirely. Drip edge, the metal that directs water off the deck edge into the gutter, is part of the roof and required by code, but the gutters themselves are usually a separate item. Ask whether gutters are removed and reset, replaced, or left in place, and whether the crew will clear roofing debris from them at the end.
Do I need a permit to replace my roof?
In most of the United States, yes. A full roof replacement is permitted work in the large majority of municipalities, and confirming the requirement is ultimately the homeowner's responsibility even when the contractor pulls the permit. The permit triggers a municipal inspection that independently confirms the work met code, which is exactly what a future buyer's inspector and your insurer will want to see. A contractor suggesting you skip the permit is removing your only independent quality check.
What is the difference between a roof replacement and a roof recover?
A replacement, or tear-off, removes the old roofing down to the deck so the crew can inspect and repair the wood and rebuild the water-shedding system from scratch. A recover, or roof-over, lays new shingles on top of the existing layer. A recover is cheaper but hides every problem underneath, adds weight, and shortens the new roof's life. Building code also bars a recover where the roof already has two or more existing layers, making a tear-off mandatory.
What paperwork should I receive after a roof replacement?
Ask for a packet with the itemized final invoice, the manufacturer warranty documents plus confirmation of registration, the contractor's written workmanship warranty, the exact shingle line and color installed, the permit and final inspection record, photos and notes of any deck repairs, and a written list of anything the crew observed but did not repair. Keep it where you will find it years later, because you will need it when you sell the home or file a claim.
How long does a roof replacement take?
A typical single-family asphalt shingle reroof is often done in one to three days, but the timeline swings with roof size, pitch, complexity, and weather. Steep or cut-up roofs with many valleys, dormers, and chimneys take longer because each transition is hand-flashed. A disciplined crew opens only as much roof as it can make watertight by day's end, so a multi-day job should never leave large areas of bare deck exposed to rain overnight.
Is attic ventilation part of a roof replacement?
It should be, because a reroof is the natural moment to fix it while the roof is open. A balanced system pulls cool air in low at the soffits and exhausts warm, moist air high at the ridge; getting it wrong traps heat against the deck, shortens shingle life, and feeds ice dams. The scope should name the exhaust vents being installed, confirm the soffit intake is adequate, and address any old or powered vents rather than just swapping like for like.
What is usually not included in a roof replacement quote?
Common exclusions are deck or fascia repair found after tear-off, chimney masonry work, skylight or solar removal and reinstallation, gutter replacement, ventilation upgrades beyond a like-for-like swap, interior drywall or mold repair, permit fees, HOA approvals, and upgrades like impact-resistant or cool-roof shingles. The contract controls, so confirm each of these in writing rather than assuming. Surprise bills almost always come from an item the homeowner thought was included and the contractor always treated as extra.
The Roofline by RoofPredict
Stay Ahead of Roofing Market Changes
Join The Roofline by RoofPredict for weekly roofing intelligence: material price signals, storm demand, insurance and regulatory updates, sales tactics, and local contractor opportunities.
Sources
- NRCA Roofing Guidelines Resources — nrca.net
- Atlas Roofing: 2021-2024 Building Code Roofing Provisions — atlasroofing.com
- Ridgeline Roofing: Roof Replacement Costs in 2026 — ridgeline-roofing.com
- UpCodes: IRC Ice Barrier Requirements — up.codes
- ARMA: Nail Application of Asphalt Strip Shingles — asphaltroofing.org
- Jaspector: IRC 2024 Drip Edge Flashing (R905.2.8.5) — jaspector.com
- Southern Home Improvement: Skylight Replacement During Reroof — southernhomeimprovement.com
- NRCA Guidelines for Attic Ventilation (PDF) — nrca.net
- GAF Attic Ventilation Calculator — gaf.com
- SquareDash: Roof Replacement Permits by State — squaredash.com
- FTC: How To Avoid a Home Improvement Scam — consumer.ftc.gov
- GAF Residential Roof Warranty Comparison — gaf.com
- FEMA Case Study: Hail, Hail, the Roof's Still Here — fema.gov
- ENERGY STAR: Cool Roofs — energystar.gov
- This Old House: Roof Replacement Cost — thisoldhouse.com
- Jamar Roofing: Factors That Drive Up Roof Replacement Costs in 2026 — jamarroofing.com
Related Articles
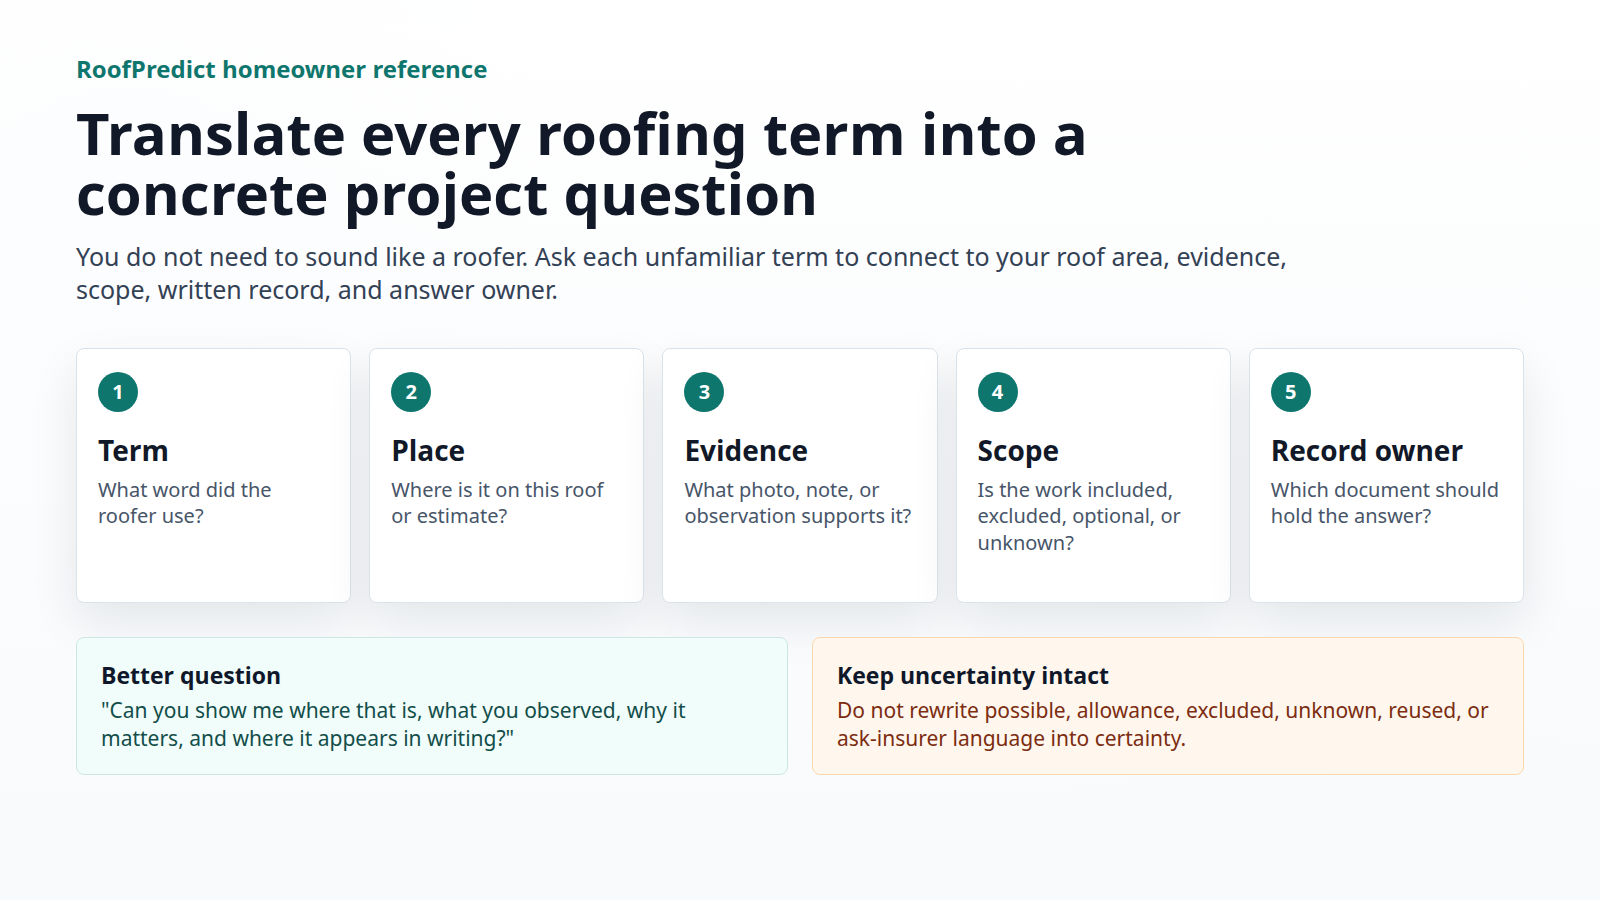
How to Talk to a Roofer Without Knowing Roofing Terms
You do not need to sound like a roofer to have a useful conversation with one. Ask the roofer to translate every unfamiliar term into the roof area, the observed evidence, why it matters, the recommended work, and the written follow-up record.
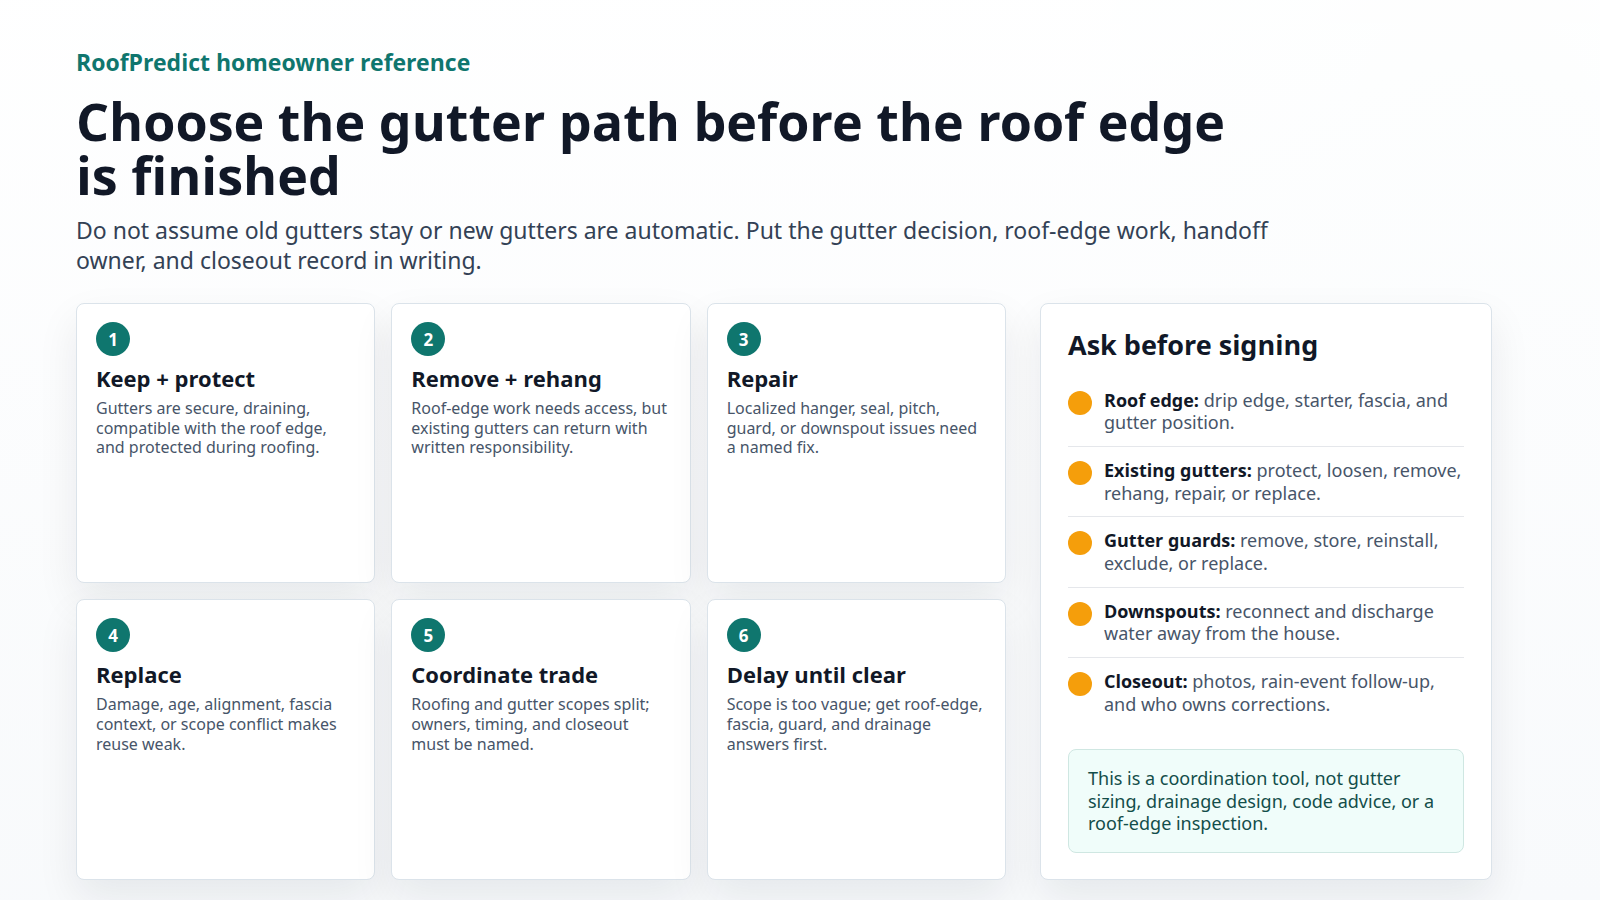
Should You Replace Gutters When You Replace Your Roof? Homeowner Checklist
You do not automatically need to replace gutters when you replace a roof. You should review them at the same time because the roof edge, drip edge, fascia, gutters, downspouts, and drainage path all work together.
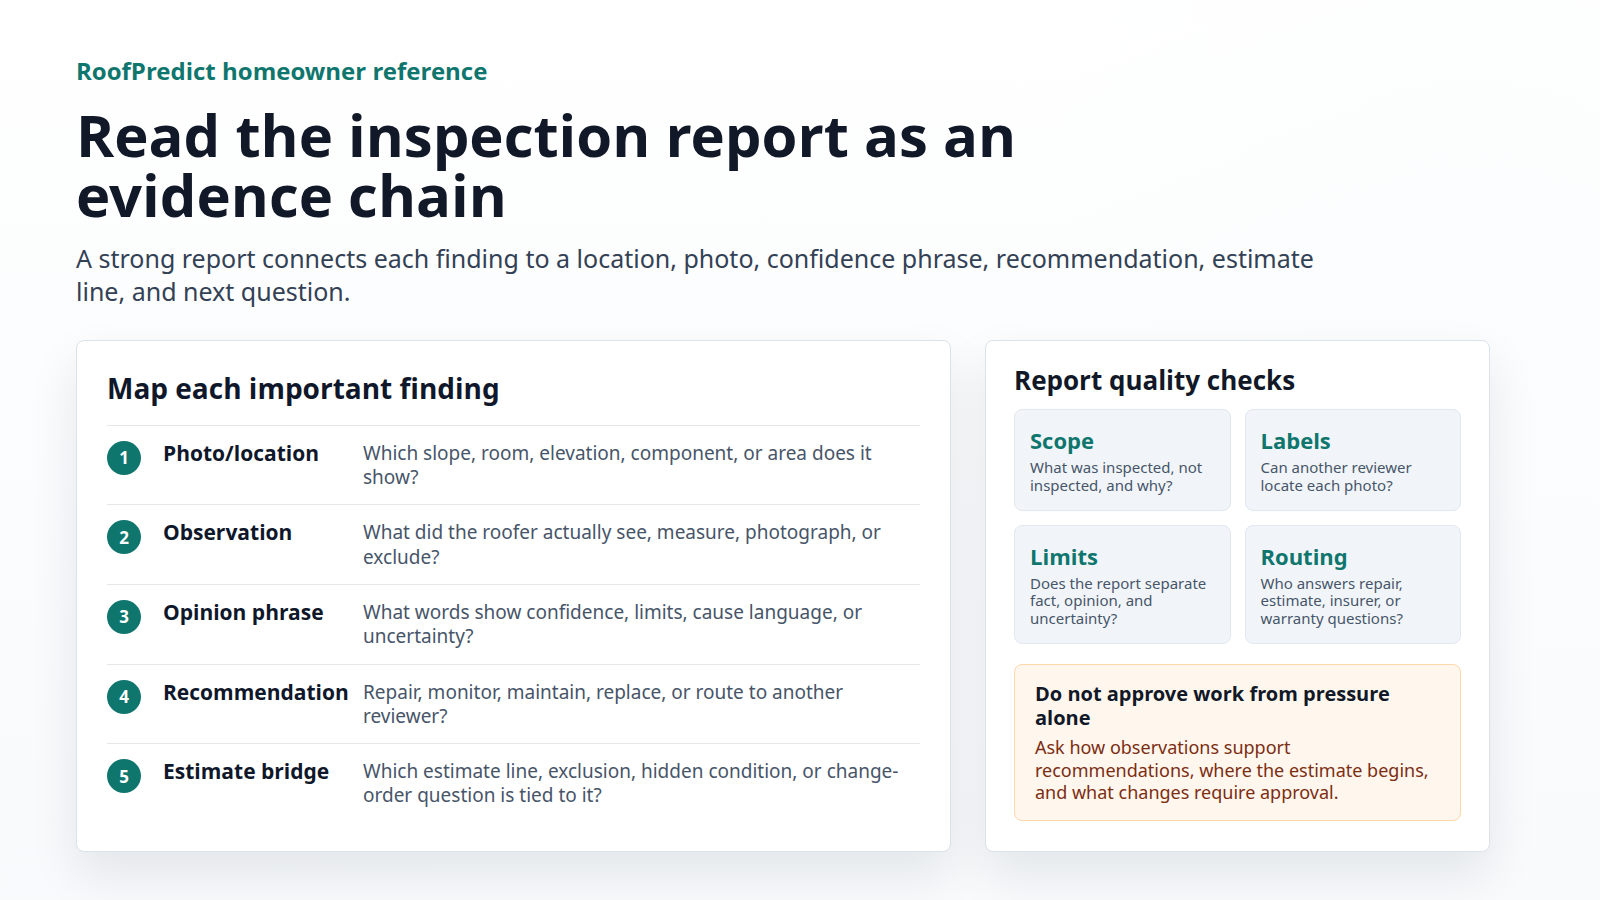
How to Read a Roofer Inspection Report as a Homeowner
A roofer inspection report is easier to use when each finding connects to a photo, location, limit, confidence phrase, recommendation, and next reviewer. This homeowner guide shows how to map the report before approving work.