What Roof Photos Should You Take Before Calling Insurance?
On this page
Take roof photos before calling insurance in this order: safety hazards, wide interior room photos, close interior damage photos, safe attic views if available, exterior overview photos, roof-facing views from the ground or windows, gutters and downspouts, vents and flashing, skylights and chimney areas, siding and windows, debris and impact points, damaged belongings, receipts or temporary repair records, and a short note that says when you found the damage.
Do not climb on the roof or stand on a ladder for this checklist. Do not enter a room, attic, or yard area with downed wires, gas odor, floodwater, sagging ceilings, shifting structure, broken glass, active lightning, or high wind. A useful photo packet is not the most dramatic set of pictures. It is the clearest safe record of what you could see before cleanup, temporary protection, or repair changed the scene.
Quick Answer
Before calling insurance, capture these photos and notes only from safe locations:
- Safety hazards that limit access, such as downed wires, floodwater, broken glass, gas utility concerns, sagging ceilings, fallen limbs, or blocked entries.
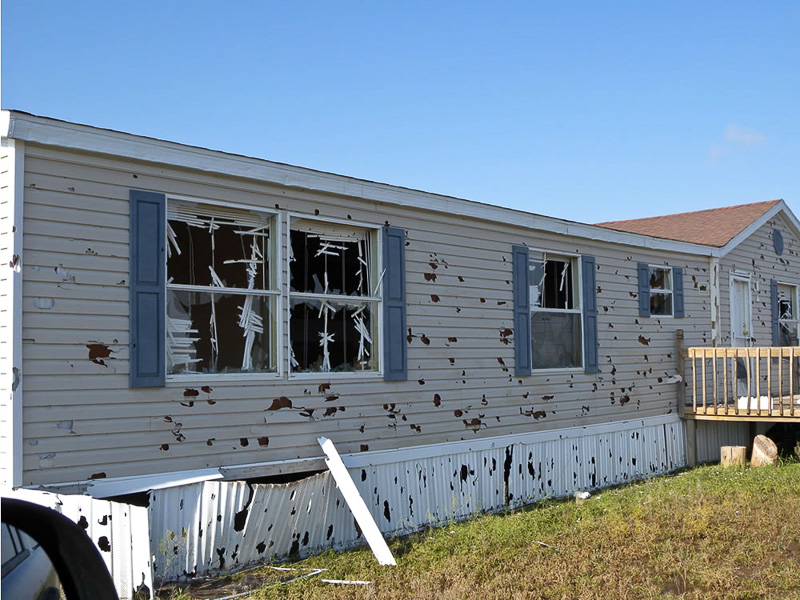
- A wide photo of each affected room from the doorway or hallway.
- Close photos of stains, drips, bubbling paint, wet flooring, damaged trim, damaged insulation, or damaged belongings.
- A short video of active dripping if it can be taken safely from a stable floor.
- Attic photos only from safe access, such as a hatch view or stable walking surface, never by crawling over joists or wet insulation.
- Exterior overview photos of each side of the home from the yard, driveway, sidewalk, or street.
- Roof-facing photos from the ground, a window, or another stable non-roof location.
- Gutters, downspouts, vents, pipe boots, flashing, skylights, chimney areas, fascia, soffit, siding, windows, screens, and debris where visible.
- Damaged belongings and damaged materials before disposal, when it is safe to wait.
- Receipts, temporary repair records, contractor photos, policy notes, claim notes if a claim already exists, and the storm or discovery date.
National Weather Service hurricane recovery guidance supports returning only when officials say it is safe and watching for downed wires, weakened structures, gas leaks, floodwater, and unsafe buildings. NWS high-wind guidance warns people not to go near downed power lines and to be careful with wind-blown debris. FEMA severe-weather documentation guidance supports photos and videos of structural and personal property damage inside and outside the home, plus receipts and material samples where relevant. Those sources support safe documentation. They do not decide whether roof damage is covered.
Source review date: June 9, 2026.
Safety Comes Before The Shot List
Start with the hazard picture, not the roof picture. If something makes the property unsafe, document it only from a safe distance or skip the photo and call the right emergency, utility, or local authority contact.
For this homeowner checklist, "safe location" means ground, doorway, hallway, sidewalk, driveway, street, stable interior floor, or a window view. It does not mean roof, ladder, damaged balcony, wet attic, unstable deck, fallen tree, or any surface that puts you near a roof edge or electrical hazard.
OSHA's roof fall-prevention fact sheet frames roof and ladder work around planning, proper equipment, training, stable footing, secured ladders, and fall protection. That is worker-safety context, not permission for a homeowner to climb after a storm. For this checklist, roof-level photos belong to a qualified roofer, adjuster, emergency contractor, mitigation company, or other person who can work safely and carry the right equipment.
For a homeowner photo packet:
- Use zoom instead of getting closer to roof edges, wires, broken branches, or unstable debris.
- Photograph from daylight when possible.
- Keep children, pets, and bystanders away from damaged areas.
- Do not move heavy debris for a better view.
- Write "not visible safely" when a roof plane, attic area, or exterior side cannot be seen without unsafe access.
If you already have active water entry, a sagging ceiling, or electrical risk, the next step may be safety and temporary protection rather than more photos. Take enough pictures to preserve the record, then stop.
Roof Damage Photo Checklist Before Calling Insurance
Use a simple sequence so the insurer, agent, adjuster, roofer, or reviewer can understand where each picture belongs.
| Photo order | What to photograph | Safe rule |
|---|---|---|
| 1 | Safety hazards and access limits. | Safe distance only. |
| 2 | Interior room overview. | Doorway, hall, or stable floor. |
| 3 | Interior leak or damage close-ups. | Stable floor; no wet electrical areas. |
| 4 | Attic view if safe. | Hatch or stable surface only. |
| 5 | Exterior overview of each side. | Ground, sidewalk, driveway, or street. |
| 6 | Roof-facing visible conditions. | Ground or window; no roof or ladder. |
| 7 | Gutters, vents, flashing, skylights, chimney, siding, windows, debris. | Ground or interior view. |
| 8 | Belongings, receipts, contractor records, and notes. | Safe room or file location. |
Photograph the room first, then the damage. A ceiling stain close-up without a room photo is harder to place later. Label the room in your notes: "second-floor bedroom, north wall," "kitchen ceiling near range," or "garage ceiling below rear roof slope." Plain location language matters more than dramatic wording.
If the attic is safe to view from the hatch or a stable walking surface, take photos of visible daylight, wet insulation, stains, dark sheathing, drips, or water trails. Do not crawl across joists, step onto wet insulation, touch wiring, pull back insulation, remove roof material, or enter if the ceiling is sagging. If the attic is not safe or not accessible, write that down.
Walk around the home only if the yard and surrounding area are safe. Take wide photos of all four sides. Include the roof edge, gutters, siding, windows, garage, porch roof, chimney, skylights, and visible storm debris. The FloodSmart documentation page recommends clear photos and videos before cleanup, including wide shots and close-ups. That wide-to-close pattern works for roof-related damage too.
From the ground, driveway, sidewalk, deck, or an upper-story window, photograph roof planes where you can see missing, lifted, curled, torn, cracked, or displaced materials. If you cannot see the roof clearly, do not force it. A note that says "rear roof slope not visible from ground" is a valid record.
The Owens Corning roof storm damage checklist supports perimeter and window observations, pictures of visible storm damage, and categories such as dented, torn, curled, or missing shingles. The GAF storm damage guide supports safe-vantage documentation inside and outside, including missing, cracked, or curled shingles, debris, bent or detached flashing, water intrusion, and professional roof checks.
Use manufacturer pages as photo-category support, not as proof of a covered loss. A picture of a missing shingle shows a condition. It does not decide wind cause, hail cause, wear, installation quality, policy language, deductible, warranty, repair scope, or payment.
Official Source Table
| Source | Use it for | Do not use it for |
|---|---|---|
| NWS hurricane and wind safety pages | Return-home caution, downed wires, gas and structural hazards, floodwater, unsafe buildings, debris, and weather updates. | Roof repair, photo proof rules, or insurance decisions. |
| OSHA roof and ladder safety materials | Why roof and ladder work requires planning, equipment, training, stable footing, and fall protection. | Homeowner roof access instructions. |
| FEMA and FloodSmart | Photos, videos, receipts, material samples, documenting before cleanup, wide shots, close shots, and repair-document caution. | Coverage guarantee, claim strategy, or repair approval. |
| NAIC claim and homeowners insurance pages | Damaged-property list, photos/videos, deductible awareness, policy information, insurer or agent contact, and broad coverage-category language. | Telling the homeowner whether to file or how a policy applies. |
| NAIC insurance department lookup | State or jurisdiction contact routing. | State-specific legal, deadline, contractor, public-adjuster, or claim-handling advice. |
| Owens Corning and GAF | Visible roof and exterior photo categories, safe-vantage documentation, and professional inspection boundaries. | Cause determination, claim approval, warranty decision, or contractor endorsement. |
| FTC and CFPB contractor guidance | Caution around contractor pressure, written estimates, licensing/insurance checks, bids, contracts, and disaster-repair scams. | Contractor selection, legal advice, or contract approval. |
| NOAA/NCEI Storm Events | Storm-date and area context. | Address-level roof damage proof, causation proof, warranty proof, or insurance coverage proof. |
| RoofPredict homepage | Contractor-facing roof age, storm context, homeowner reports, route, CRM, and team-workflow positioning. | Damage diagnosis, safety approval, claim filing, coverage decision, or homeowner claim-file storage. |
What To Avoid Before The Insurance Call
Avoid anything that weakens the record or creates safety risk:
- Do not climb on the roof or use a ladder for a better picture.
- Do not move damaged items before photographing them unless they create a health or safety issue.
- Do not delete blurry photos until you have better replacements.
- Do not use filters, markup, or heavy editing on original photos.
- Do not mix photos from different storms in the same folder without labels.
- Do not rename photos with conclusions like "wind claim proof" or "hail paid roof."
- Do not photograph private documents, faces, license plates, or neighbor property unless they are needed and you can store them carefully.
- Do not rely only on a contractor's roof photos if you can safely create your own interior and exterior context record.
Keep originals. If you need annotated copies later, make copies and mark the copies.
Contractor Photos And Repair Records
Contractor photos can be useful, especially when roof-level photos are needed and homeowners should not access the roof. Keep them in the packet, but label them separately from your own safe photos. Use a file name such as "roofer photos, rear slope, May 31" or "temporary repair invoice, kitchen leak."
The FTC home improvement scam guidance tells consumers to watch for pressure tactics, up-front payment demands, cash-only requests, permit-shifting, and loan steering, and to consider licensed and insured contractors, written estimates, and complaint checks. The CFPB disaster contractor guidance tells disaster survivors not to rush contractor decisions and to check with insurance or mortgage contacts about how insurance funds are distributed.
For this photo checklist, that means contractor photos and repair records are evidence of what someone documented or did. They are not automatic proof of coverage, cause, price reasonableness, warranty eligibility, contractor quality, or legal compliance. Save the contractor name, date, work area, estimate, invoice, payment receipt, license or insurance notes if provided, and any instruction from the insurer or agent before signing or paying for major work.
Before Calling Insurance
Before the call, gather the photo packet into a short order:
- safety or access limits;
- storm date and discovery date;
- interior damage;
- attic or access-point photos if safe;
- exterior overview;
- roof-facing photos;
- gutters, vents, windows, siding, and debris;
- damaged property list;
- receipts or temporary repair records;
- contractor photos or invoices if any;
- policy number, insurer contact, and deductible notes.
The NAIC homeowner claim guidance supports damaged-property lists, photos and videos, deductible awareness, insurer or agent contact, and policy information. The NAIC homeowners insurance overview distinguishes dwelling, other structures, personal property, loss of use, policy limits, perils, replacement cost, actual cash value, and deductibles at a high level. Use that as a call-prep boundary. This photo checklist does not tell you whether to file. It helps you avoid making the first call with scattered photos and no damage list.
When you speak with the insurer or agent, write down the date, time, person you spoke with, claim number if assigned, and any instruction about photos, inspection, temporary repairs, cleanup, damaged belongings, or contractor records. Save that note next to the photos.
Insurance Boundary Box
Photos support the record. They do not decide coverage.
This checklist does not interpret your policy, estimate your deductible, tell you whether to file, advise you to delay notice, tell you how to negotiate, decide cause of loss, choose a contractor, approve a repair scope, or predict payment. If the damage is urgent, unsafe, or actively worsening, contact the appropriate emergency, utility, insurer, agent, mitigation, or qualified repair contact rather than waiting to build a perfect photo packet.
Questions To Ask The Insurer Or Agent
Use neutral questions during the call:
- How should photos and videos be submitted?
- Should originals be preserved, or should copies be uploaded?
- Should contractor photos be uploaded separately from homeowner photos?
- What claim or policy number should be included in file names or notes?
- Are there instructions for documenting temporary repairs, cleanup, damaged belongings, or material samples?
- What should I do if I find more damage after the first call?
- Is there a preferred way to document rooms, roof sides, dates, receipts, and contractor records?
- If a claim already exists, where should follow-up notes and additional photos go?
Write down the answer, the date, and the name or department of the person who gave the instruction.
State, Policy, And Carrier Limits
Insurance requirements and consumer-protection rules can vary by state, jurisdiction, policy, carrier, claim type, and disaster program. The NAIC insurance department lookup gives state and jurisdiction contact routing for insurance departments. Use it when you need the correct regulator or consumer contact, not as a shortcut for state-specific legal advice.
Before relying on a general article, check your own policy and the instructions from your insurer or agent. Pay attention to reporting deadlines, proof-of-loss forms, deductible language, replacement-cost versus actual-cash-value treatment, mortgage-company payment handling, public-adjuster rules, contractor license rules, assignment or direction-to-pay forms, temporary-repair instructions, and photo-upload process.
This page is a documentation checklist. It is not a state law guide, public-adjuster guide, contractor-license guide, policy interpretation, legal instruction, or carrier-specific claim manual.
Weather Record Boundary
Storm-date notes can help organize the packet, especially when photos were taken after cleanup or temporary repair. Weather records are context, not proof by themselves.
The NOAA/NCEI Storm Events Database contains official Storm Data records for significant weather events, and the NCEI Storm Events FAQ explains important limits, such as how events are counted and how damage estimates should be understood. Use those pages for area and timeline context. Do not use a county storm report, radar screenshot, hail map, or neighbor's photo as address-level roof damage proof, causation proof, warranty proof, coverage proof, or repair-scope proof.
Where RoofPredict Fits
RoofPredict is built for roofing teams, not as a homeowner claim reviewer or photo vault. The RoofPredict homepage describes territory scans, ranked routes, homeowner reports with roof age and storm context, CRM lead flow, reports, and team dashboards. It also says the product is a sales system, not an inspection.
For this workflow, that means a RoofPredict-powered roofing team may bring roof-age or storm-context reporting into a follow-up conversation. RoofPredict does not create a homeowner's private insurance packet, inspect roof safety, diagnose storm damage, prove causation, file a claim, decide coverage, choose contractors, approve repairs, or replace qualified professional review.
How Local Markets Change The Photo Packet
A city or state version of a roof-photo-before-insurance page should not swap the location name into the same shot list. The useful local layer explains which safe photos, labels, and records matter more because of local roof stock, storm pattern, property access, insurance process, contractor capacity, or market timing.
In hail-heavy markets, the local packet should emphasize timing and pattern without turning weather records into proof. Homeowners can document discovery date, interior damage, safe roof-facing views, gutters, downspouts, soft-metal context, siding, screens, and contractor roof photos if later provided. A roofing company can use those records to route inspection demand after a storm corridor, but the page should still say that hail reports, radar screenshots, and neighborhood photos do not prove address-level damage or coverage.
In hurricane, coastal, lake-effect, and high-wind markets, the local packet should give more attention to safety, water entry, debris, wind-driven rain, temporary protection, salt or moisture exposure, roof-wall transitions, skylights, chimneys, vents, and access limitations. The right local advice may be to stop taking photos sooner because downed wires, floodwater, unstable structures, or unsafe reentry make documentation secondary to safety.
In older cities, dense neighborhoods, rowhomes, rentals, and first-ring suburbs, the photo packet may need tenant notes, property-manager contacts, shared-wall or shared-roof context, alley access, locked gates, old repair records, permit history, chimney photos, narrow-lot limitations, and contractor-provided roof photos. The local page should make those responsibility and access fields visible rather than pretending every homeowner can photograph all four elevations easily.
In HOA communities, condos, historic districts, high-cost metros, and real-estate transactions, the photo packet may need board, association, buyer, lender, property manager, or historic-review notes. Those records can help organize who needs the photo set, but they should not promise claim approval, board approval, faster inspection, or lower repair cost.
Material and timing context can matter for roofers too. Asphalt and petroleum-linked material costs, metal pricing, labor availability, storm-season demand, distributor lead times, emergency service backlogs, and financing pressure can affect how quickly homeowners move from photos to inspection or temporary protection. Treat those as market context, not financial advice or payment prediction.
For RoofPredict and the contractor directory, local insurance-photo content should surface real capabilities: inspection availability, roof type, service radius, emergency protection, safe photo review, contractor roof photos, adjuster-meeting support, warranty-document handling, storm documentation, and production handoff. For a state market brief, the page should use verified facts about severe-weather patterns, state insurance process, contractor licensing, roof stock, housing age, material availability, labor capacity, and local access constraints. That is what makes a city or state page worth indexing.
Related RoofPredict Workflows
Use this page for the pre-call roof photo checklist. Use related workflows for adjacent decisions:
- Homeowner roof damage report template after a storm owns the broader storm-damage packet.
- Emergency roof tarping: what homeowners should document first owns temporary-protection documentation.
- Roof leak after a storm: what to do in the first 24 hours owns first-day leak triage.
- How to prepare for an insurance adjuster roof inspection owns adjuster-visit preparation.
- Granule loss, blistering, and cracking: what homeowners should photograph owns surface-condition photo labels.
- How much roof damage is enough to call a roofer owns the professional-call threshold.
Checklist Before You Call Insurance
Use this checklist before the call:
- You did not climb onto the roof or use a ladder for photos.
- Safety hazards are documented only from a safe distance.
- Interior room photos show both wide context and close detail.
- Attic photos were taken only if access was safe.
- Exterior overview photos show each side of the home.
- Roof-facing photos show only what is visible from safe vantage points.
- Gutters, downspouts, vents, flashing, skylights, chimney, siding, windows, screens, and debris are included where relevant.
- Damaged belongings are listed and photographed before disposal when safe.
- Receipts, temporary repair records, contractor photos, and material samples are saved where relevant.
- Contractor records are separated from homeowner photos and insurer notes.
- Photo files use a simple naming and grouping method, such as storm date, room or exterior side, and photo sequence.
- Original photos are preserved.
- Storm date, discovery date, first-photo date, cleanup date, and temporary repair dates are written down.
- Deductible and policy contact information are nearby.
- Follow-up questions for the insurer, agent, roofer, contractor, or state insurance department are written down.
Examples
Active ceiling leak: Water is dripping through a bedroom ceiling after a storm. Start with the safety status, a room-wide photo, a close photo of the drip, a short video from a stable floor, bucket or towel photos if they show the leak path, and exterior roof-facing photos from the ground if the weather and yard are safe. Do not enter a wet electrical area or climb for roof photos.
Missing shingle visible from the driveway: Take a whole-elevation photo, then a zoomed roof-facing photo from the driveway or sidewalk. Add the date, discovery time, storm date if known, and what is not visible from safe ground. Do not label the file "wind proof" or "covered loss."
Branch impact where roof access is unsafe: Photograph the branch from a safe distance, the affected side of the home, interior water signs if any, and any contractor photos later provided. Do not move the branch, stand under it, or climb to see the puncture. Save temporary repair invoices separately from permanent repair quotes.
Source Limits
| Source | Use it for | Do not use it for |
|---|---|---|
| NWS, OSHA, FEMA, and FloodSmart | Safety-first documentation, no-roof-access boundaries, wide and close photos, videos, receipts, and material samples. | Roof repair instruction, insurance coverage decisions, or claim strategy. |
| NAIC and state insurance department lookup | Damaged-property lists, photos/videos, deductible awareness, policy contact, broad policy concepts, and regulator contact routing. | Filing advice, legal advice, state-specific deadlines, or policy interpretation. |
| Owens Corning and GAF | Visible roof and exterior photo categories and professional inspection boundaries. | Cause determination, warranty approval, claim approval, or contractor endorsement. |
| FTC and CFPB | Contractor-documentation cautions and disaster-repair scam boundaries. | Choosing a contractor, approving a contract, or giving legal advice. |
| NOAA/NCEI | Storm-date and area context. | Address-level roof damage, causation, warranty, coverage, or repair-scope proof. |
| RoofPredict | Contractor-facing roof age, storm context, reports, route, CRM, and team workflow context. | Homeowner claim-file management, inspection, diagnosis, coverage decision, claim filing, or contractor selection. |
FAQ
What photos should I take for a roof insurance claim?
Take safety hazards, wide room photos, close damage photos, safe attic views if available, exterior overview photos, roof-facing photos from the ground or windows, gutters, vents, flashing, skylights, chimney areas, siding, windows, debris, damaged belongings, receipts, temporary repair records, contractor photos, and date notes.
Should I take photos before cleanup or tarping?
Yes, if it is safe. Take enough wide and close photos to show what existed before cleanup or temporary protection changed the scene. If waiting creates a health, safety, or water-intrusion problem, prioritize safety and temporary protection, then document what changed.
What if I cannot see the roof from the ground?
Write that down. "Rear roof slope not visible from safe ground" is better than climbing. Ask a qualified roofer, adjuster, emergency contractor, or mitigation company for roof-level photos if they are needed.
Should I use contractor roof photos?
Yes, keep contractor photos if they are provided, but label them separately from your own photos. Contractor photos do not automatically prove coverage, cause, price reasonableness, warranty eligibility, or repair scope.
Do I need timestamps?
Preserve original photo files when possible because the file metadata may help show timing. Also write a plain note with the storm date, discovery date, first-photo date, cleanup date, temporary repair date, and insurance-call date.
Do photos prove insurance coverage?
No. Photos support the record. Coverage depends on the policy, facts, deductible, inspection, documentation, carrier review, state or jurisdiction rules where applicable, and any claim process instructions.
The Roofline by RoofPredict
Stay Ahead of Roofing Market Changes
Join The Roofline by RoofPredict for weekly roofing intelligence: material price signals, storm demand, insurance and regulatory updates, sales tactics, and local contractor opportunities.
Sources
- After a Hurricane — weather.gov
- After a High Wind Event — weather.gov
- Falls From Roofs Can Be Prevented — osha.gov
- How to Document Damages After Severe Weather Events — fema.gov
- How to document flood damage — floodsmart.gov
- What You Need to Know When Filing a Homeowners Claim — content.naic.org
- Homeowners Insurance — content.naic.org
- State Insurance Departments — content.naic.org
- Roof Storm Damage Checklist — owenscorning.com
- Storm Damage Roof Repairs: Resources Guide — gaf.com
- How To Avoid a Home Improvement Scam — consumer.ftc.gov
- How can I find and work with contractors to rebuild after a disaster? — consumerfinance.gov
- Storm Events Database — ncei.noaa.gov
- Storm Events Database FAQ — ncei.noaa.gov
- RoofPredict — roofpredict.com
Related Articles
How To Build A Homeowner Storm Damage Report Before The First Visit
A homeowner storm damage report is a safe pre-visit handoff for the roofer. It should tell the roofer what happened, what you observed, what photos and documents you have, and what still needs inspection.
Should You File A Roof Insurance Claim After Hail? Evidence Checklist
There is no safe universal answer to "should I file a roof insurance claim after hail?" The better first step is to build a pre-filing evidence file: safety status, visible property evidence, storm-date context, roof age, receipts, policy questions,...
How To Tell If Hail Damaged Your Roof From The Ground
You cannot confirm hail damage to a roof from the ground. You can collect clues that make the next conversation safer: storm date, safe photos, collateral dents, spatter, visible missing or lifted material, granules near downspouts, interior stains, and...